What’s the Weather Like?
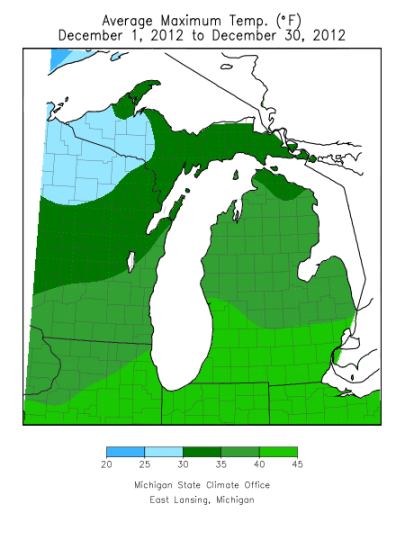
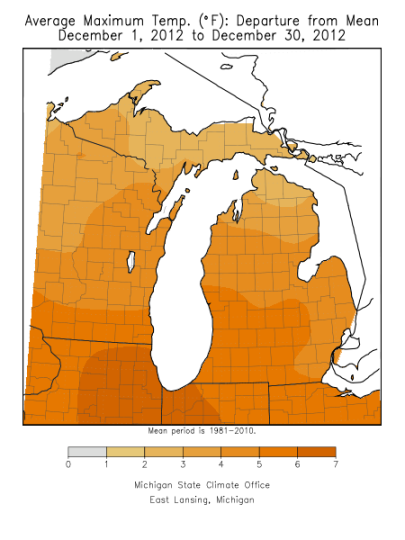
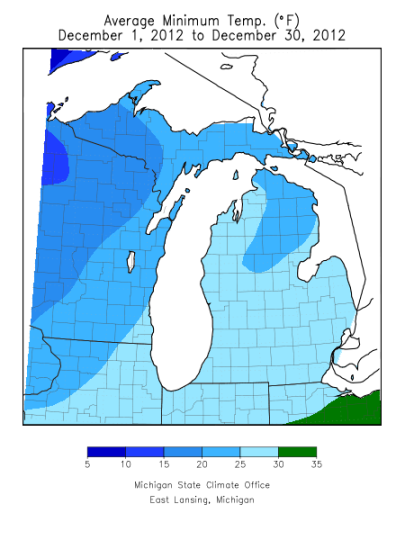
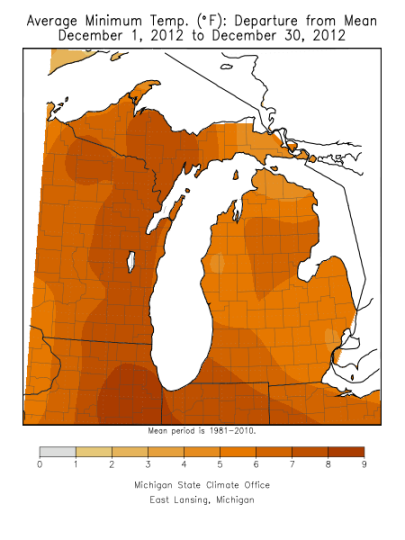
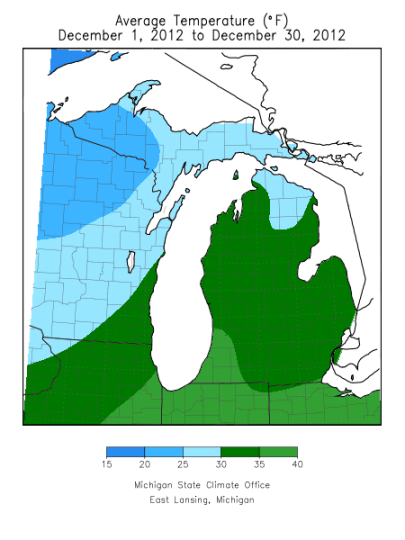
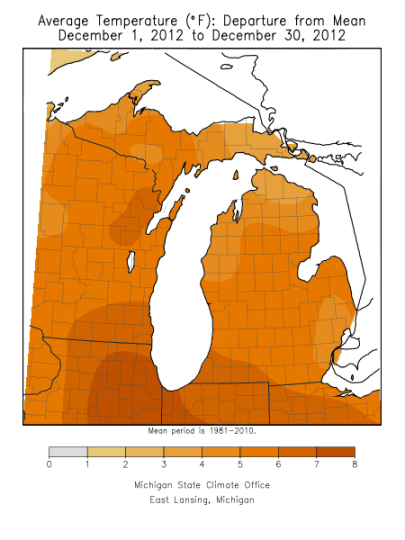
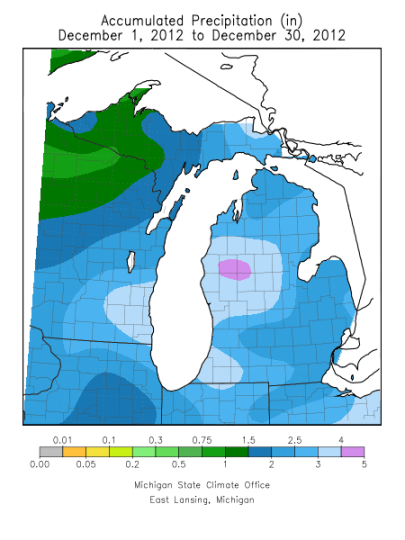
It’s April. This may seem obvious unless you are gauging the season by the weather, in which case you might guess that it was June. Unless you’ve been living under a rock for the last month you know March was anything but average weather-wise. As was true of February, all of the average temperature indices in March were above normal for our area: mean daily low temperatures for the month were up by 14 to 15°F, mean daily high temperatures were up by 15 to 16°F, and overall mean daily temperatures were up by 14 to 15°F. In addition to being a warmer month than normal, March was also a wetter than average month with total precipitation 0.5 to 0.75 inches greater than the historical average for our area of southwest Michigan.


But let’s turn to April. Average daytime high temperature in this area of southwestMichiganfor the month of April is 60°F while the average nighttime low of 38°F is above freezing for the first time since November. The mean daily temperature is 49°F. We can expect the high temperature every day this month will be above freezing (at this point, we shouldn’t have to worry about days not breaking the 32°F barrier until November), but we’ll have to wait a little longer for completely frost-free days. We should anticipate the daily low temperature dipping below freezing about 10 days this month. The mean precipitation (liquid equivalent) for April is 3.6 inches with only about 3 inches of snow this month. On average we will see 8 days with at least 0.1 inches of rain in April, and two of those days we can expect a half an inch or more. Day length continues to increase; we have gained about three and three-quarters hours of daylight since the winter solstice, and by the end of April, we will have gained about 5 hours!
What Are The Bees Doing?
With the warming temperatures and increased day length, the queen’s egg laying continues to increase, and the brood area continues to grow within the colony. Drones make their unequivocal appearance this month. Food consumption increases as the population increases, but this month there are plenty of natural sources of nectar and pollen, and the field bees can be seen returning to the colony with pollen baskets loaded with pollen in shades of red, yellow, and orange.
What’s Blooming?
Because of our unusually warm early spring weather, many of the nectar and pollen sources that normally become abundant this month have already been available for several weeks. Although the weather has moderated a bit lately (there are frost warnings posted for tonight in our area), the spring bloom continues way ahead of schedule. In a “normal” year, the early sources that became available in March (the maples and willows) continuing blooming into April. These early sources are joined during April in our area by the blooms that yield the first significant nectar flows. By the end of the month the major fruit blooms will be in full swing, including cherries (first the sweet and then the tart), apples, peaches, plums, and pears. Sassafras and serviceberry bloom this month, as do dandelions, mustard, and yellow rocket. It is only under intensive management systems that surplus crops of honey are garnered from these April nectar flows, so you may not see apple blossom honey in your local store. But even in the absence of surpluses, this spring nectar flow is vitally important to the colonies as they build in strength and numbers leading up to the major summer nectar flows.
What Is The Beekeeper (Me) Doing?
April usually represents the first month where the weather is warm enough to allow a thorough inspection of the bees. I recommend a thorough inspection of each colony a minimum of twice per year; once in the Spring to assess the colony status in preparation for the summer honey flow, and again in the Fall to assist in making your Winter management decisions. Normally, one shouldn’t disturb the cluster when the temperature is below 55°F (it’s okay to lift the cover to add syrup or pollen patties when it’s below 55°F, but you shouldn’t remove frames or you risk chilling the brood), and the closer to 70°F before pulling frames out the better. Basic early spring management includes checking on the health of each colony, cleaning bottom boards, medicating (if you are using medications), and reversing supers. This is also the time of year to think about making splits and requeening colonies.
When you finally get the chance to do that first thorough inspection, don’t forget to take the most important tool: a notebook and pencil. Every time you inspect your hives, take some notes. It can be nothing more than some lined paper, or you can use a checklist like the one found in a number of the catalogs from the major bee suppliers. Or do as I did and develop a checklist of your own that reflects the way you work with your bees. Regardless of what you use, be sure to take notes. They are an invaluable tool for preventing you from overlooking something during your inspections, and for planning your subsequent management activities.
When you visit your hives, take a moment or two before opening your colony to observe the activity at the colony entrance. Is there pollen coming into the colony? If there is, you can be reasonably certain there is brood being fed, and by extension that your queen is laying. Do the bees come and go with purpose, or do they hang around the entrance and appear nervous? Are there any chalkbrood mummies on the landing board? If you have more than one colony, is the activity comparable between all the colonies or do some colonies have noticeably reduced activity compared to others? All of these observations can give you clues regarding the general health status of your colonies before you ever lift an outer cover.
Once you open your colonies, one of the most important components for checking on the health of the colony is evaluating your queens. Can you find the queen? It’s not necessary to actually find the queen as long as you see evidence of the queen in the form of eggs and brood (though because of the relatively small population within the colony during this time of year, this is often the easiest time to spot the queen). Is it the queen you supplied? This is one of the reasons for using marked queens; you can tell immediately if the queen you are looking at is one you supplied or if it is one the bees provided as a result of swarming or supersedure. Is there a good, solid brood pattern with only occasional skipped cells? A spotty brood pattern can be an indication of a failing queen or the presence of brood disease. If you can estimate the proportions of eggs, unsealed brood and sealed brood, you should ideally find approximately a 1:2:4 ratio. This is because it takes 3 days for the eggs to hatch, 6 days as unsealed larvae, and 12 days as sealed brood prior to emergence as adult bees. Since eggs may be difficult to see, another ratio one can use is unsealed to sealed brood which should approximate a 3:4 ratio (almost equal amounts). A significant alteration in this ratio suggests there is a problem that should be investigated. A greater proportion of sealed brood suggests egg laying has been interrupted for some reason (old, injured, or lost queen; swarming; etc.) while a greater proportion of unsealed brood suggests loss of sealed brood for some reason (chilling, disease, a new queen resulting from supersedure or swarming, etc.).
Use this first inspection opportunity to clean off your bottom boards. Dead bees on the bottom board are to be expected after a long winter of confinement, and two or three cups of dead bees are not unusual following a long, cold winter. Cleaning the dead bees off the bottom board opens up the lower entrance of the colony, increases ventilation, and removes potential pathogens from the colony.
Menthol and/or grease patties for tracheal mites, Terramycin extender patties for American foulbrood, Fumadil-B for nosema, and Apistan or CheckMite+ for varroa mites may be indicated for disease and parasite control. When using any medications, be sure they are removed sufficiently far in advance of putting on extracting supers to avoid contaminating honey for human consumption; extracting supers can be put on immediately after removing Apistan strips; CheckMite+ strips require a 14 day treatment-free period before putting extracting supers on; and Terramycin should be removed at least six weeks before putting on extracting supers.
Reversing or rotating hive bodies improves the brood distribution within the colony and aids in swarm control later in the season. As winter progresses, the queen tends to move up through the hive, and is apparently very reluctant to move down. As a result, as brood production increases, the area in which the queen is laying quickly becomes filled and the queen, being disinclined to moving down through the hive, runs out of places to lay eggs. This can be one of the stimuli for swarming. It is a very simple matter to switch the positions of the upper and lower hive bodies (if you hive your bees in two supers), thus putting a relatively empty super above the queen for her to move into and continue laying. If you winter colonies in three supers (like I do), you can perform a partial reversal initially, which involves switching the positions of the upper two supers, followed by a complete reversal (switching the positions of the upper and lower supers) two or three weeks later. Reversals can be repeated every three or four weeks to continue to encourage the queen to utilize the entire brood nest for egg laying. It’s important to note that the initial reversal should only be done when the bulk of the bees and brood occupy only the top super. Reversing when the brood nest straddles two brood boxes splits the brood nest into two noncontiguous portions that the bees will have difficulty keeping warm. This can set back the spring buildup of your colony.
April is a good time to make splits and requeen colonies. Splits can be made to increase colony numbers, produce nucleus colonies for personal use or sale, or as an aid in swarm control. There are a myriad of methods for making splits, but the basic process is you remove frames of brood and bees from one colony, place them in an empty colony, and introduce a new queen. This split is referred to as a nucleus colony if it is maintained as a small colony, usually on 4 or 5 frames, or as an increase colony if it is placed into a standard size hive body and built up to be a full size colony. Because you reduce the population of the parent colony when you remove frames of brood and bees, you reduce the propensity for swarming for that colony. The timing of making splits is limited by the availability of queens if purchasing queens for your splits, or the availability of natural populations of drones (for mating purposes) if letting the bees raise their own queens. A good rule of thumb in a normal year is to wait at least until the dandelions and fruit trees are in bloom before making splits or requeening. Considering how early everything is blooming this year, an alternate rule of thumb in our area is to wait until Earth Day (April 22) to minimize the number of exceptionally cold nights a small nucleus colony may experience.
This year I plan on raising a few more queens than last year. My original plan called for me to begin the process around Earth Day, but since there is drone brood in most of my colonies I am going to move my schedule up a week. As a result, I hope to have the first batch of mated, laying queens by May 26. I say “first batch” because I hope to raise two or three rounds of queens. I have received calls already concerning the availability of my queens, so I plan to increase the production a bit to accommodate the demand and still leave queens for my own use.
Last year, after my initial attempts with the Nicot system met with something less than success, I was taught the cell punch method and I am now a convert. I will be using the cell punch method this year, and will combine it with the use of a Cloake board. Once I get started, I’ll post all the details in future blogs.
One additional thing I am going to try this year is a 2-queen colony. I will use a Cloake board to combine one of my overwintered nucs with one of my standard colonies to produce a 2-queen colony, with the two queens co-existing, separated by a queen excluder. The primary advantage is supposed to be larger honey crops than with two single colonies, since the bees’ honey production increases in efficiency with increasing population. There is a potential for a really BIG colony (and a risk of really big swarms!) so for this year I am going to limit myself to a single colony managed this way until I get a feel for the pros and cons. As with the queen rearing adventures, watch the blog for details of the 2-queen system once I get things underway.
As has been true in previous months, there is still a backlog of bee journals to read and file. I will continue to get equipment ready for the coming spring season, painting and culling as necessary. I purchased 150 new frames this spring, so there are still lots of frames to assemble, as well as other equipment to get out of storage and prepare for use. These activities are never ending.
As always, questions and comments are welcome. Suggestions for topics you would like to see discussed are likewise encouraged.
Refs.
http://www.almanac.com/
http://climate.geo.msu.edu/
http://www.backyardbeekeepers.com/to-do.html